java项目_s-mall-ddd
架构
mvc

1 | your-project/ |
- Model 负责数据和业务逻辑
- View 负责界面显示
- Controller 负责处理请求和协调Model与View
1 | 用户点击按钮 |
拦截器
SpringCloud
远程调用,注册中心,网关都是在单体项目变成分布式项目后对出现的问题的解决.
远程调用:
分布式项目 数据库只能连接一个项目,不同项目之间有耦合, 所以要远程调用
注册中心:分布式项目有多个服务器,端口写死维护困难,所以要注册中心
网关:分布式项目因为有不同项目,前端只发一个json.需要网关创建路由,就知道访问哪里了.
远程调用:拆分成很多单体项目,不同项目之间通过 http请求 完成数据业务交换
Spring给我们提供了一个RestTemplate的API,可以方便的实现Http请求的发送。
注册RestTemplate到Spring容器
调用RestTemplate的API发送请求,常见方法有:
getForObject:发送Get请求并返回指定类型对象
PostForObject:发送Post请求并返回指定类型对象
put:发送PUT请求
delete:发送Delete请求
exchange:发送任意类型请求,返回ResponseEntity
可以用OpenFeign + Nacos简化开发
连接池(OK HTTP)
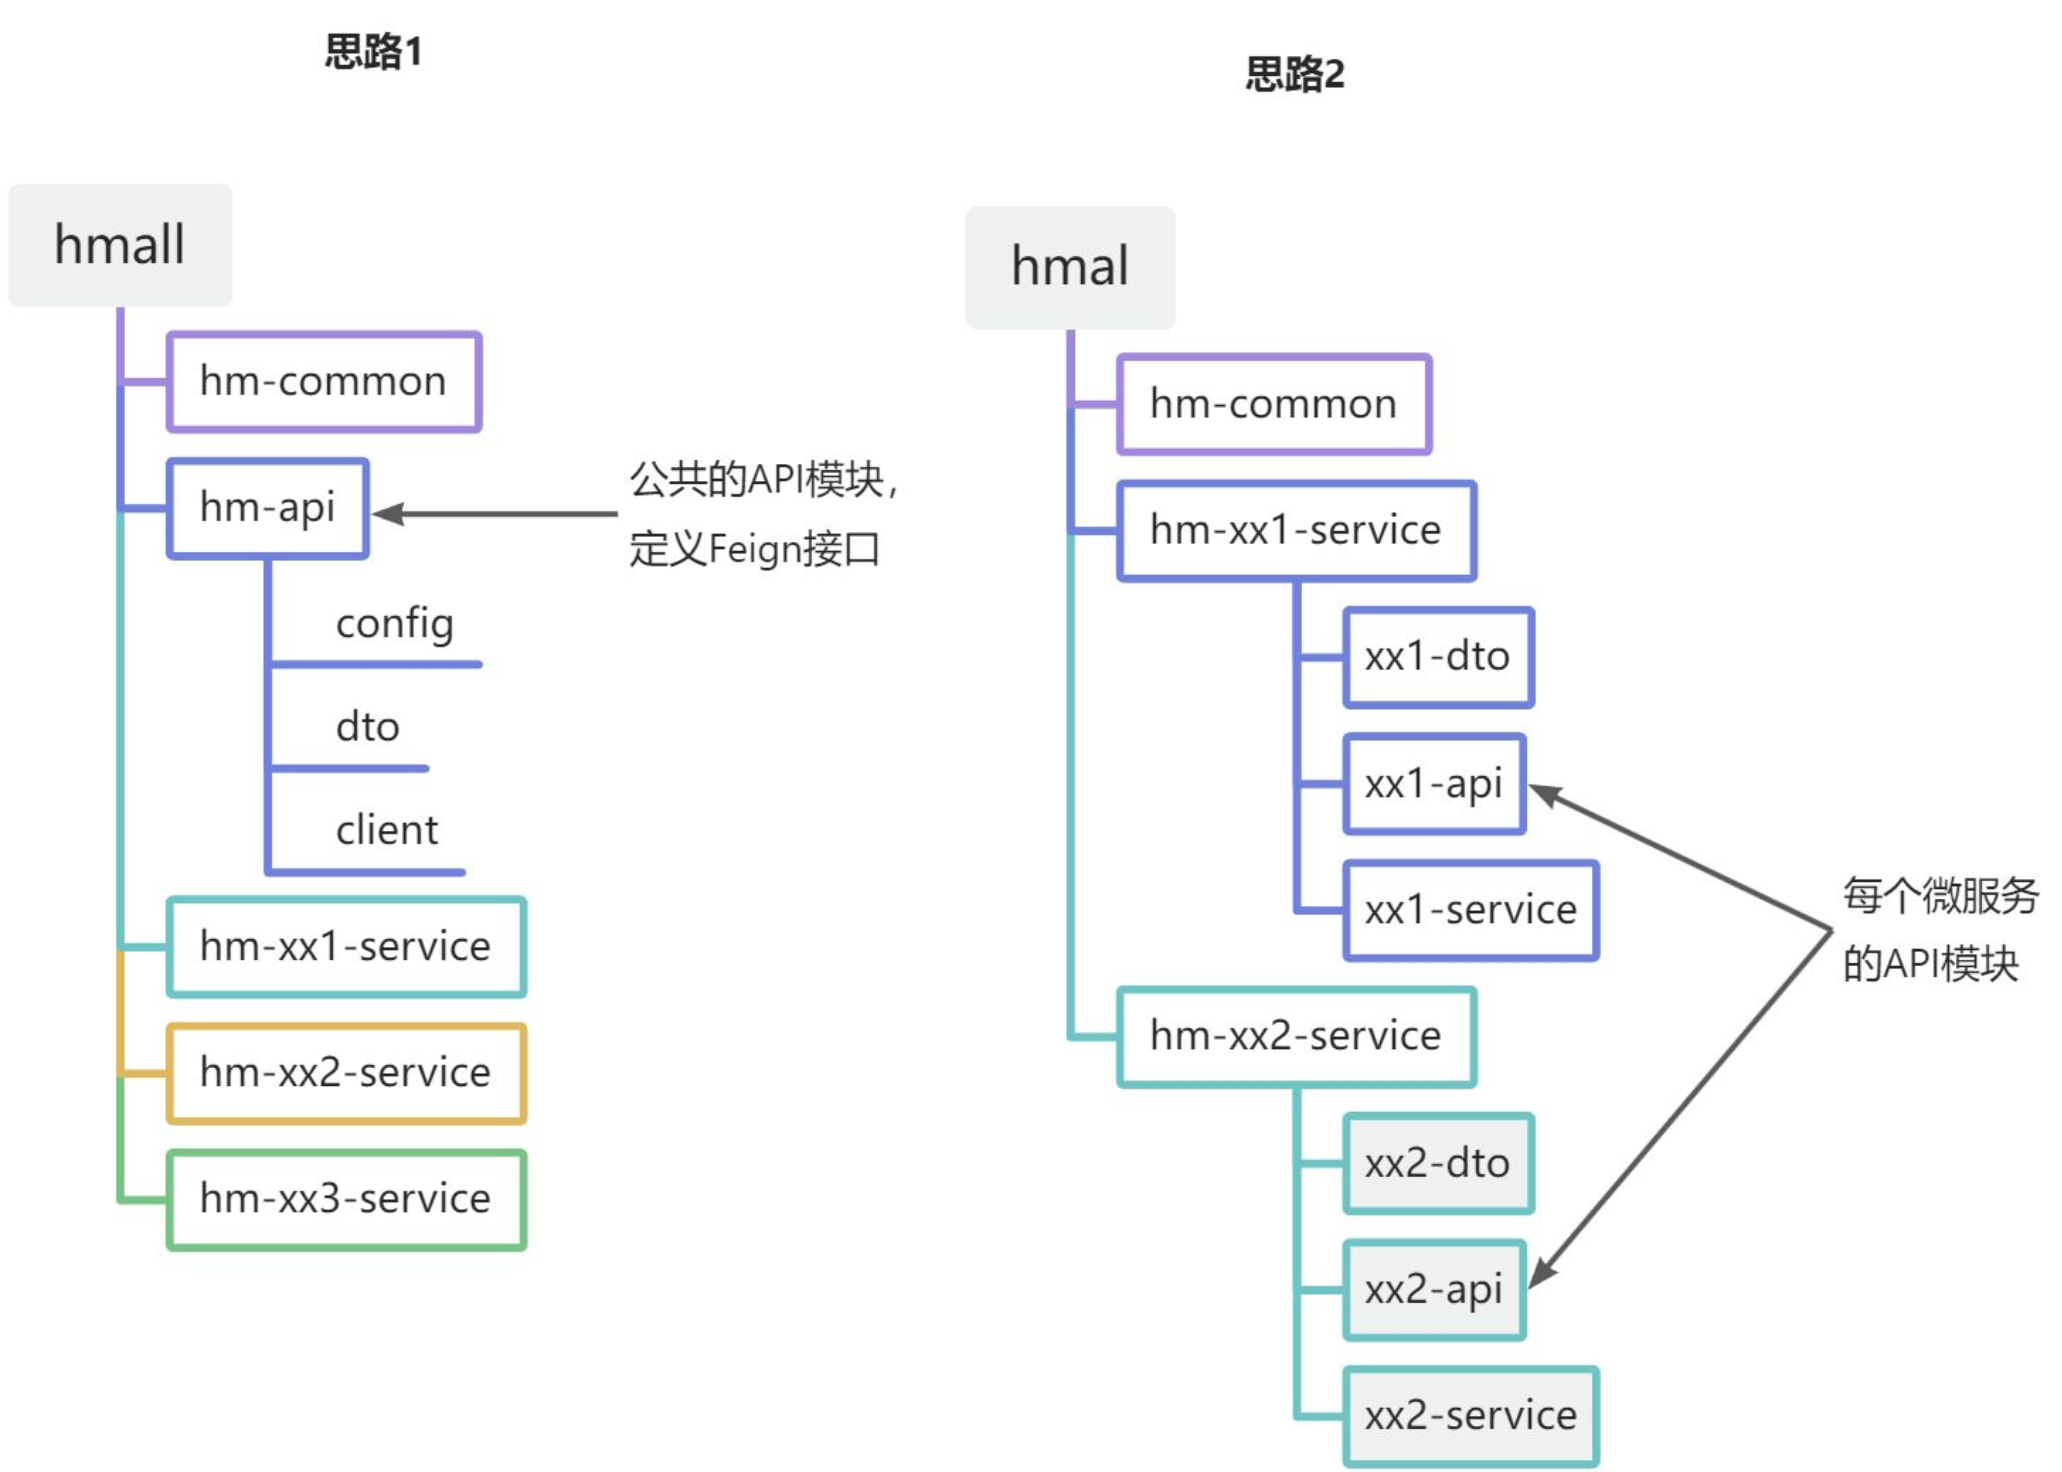
因为可能出现不同服务需要同样的Client,导致重复编码,所以可以抽取相同的Client
注册中心(nacos)
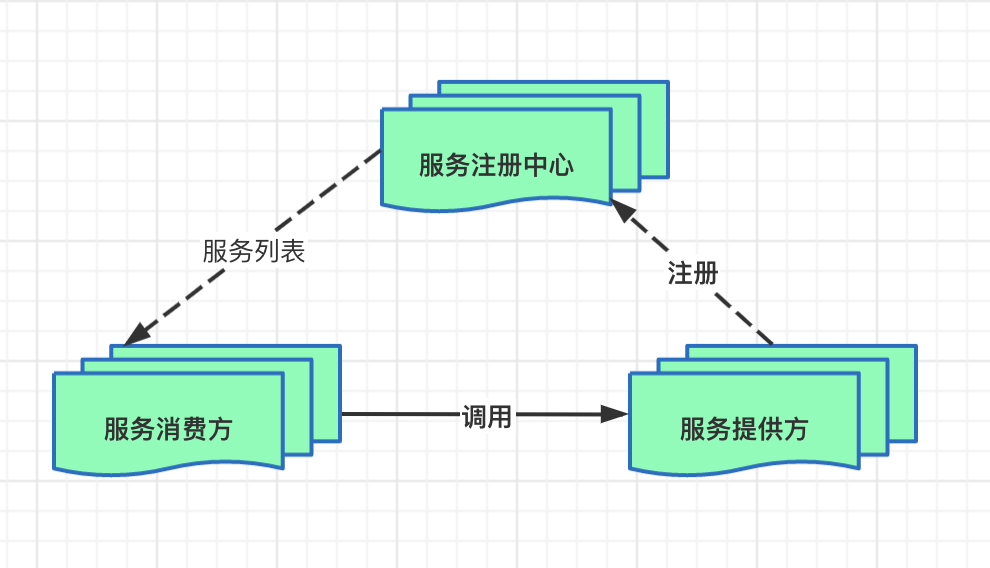
服务提供方可能不止一个服务器,
这时就需要有一个注册中心为服务消费方找到要调用的端口
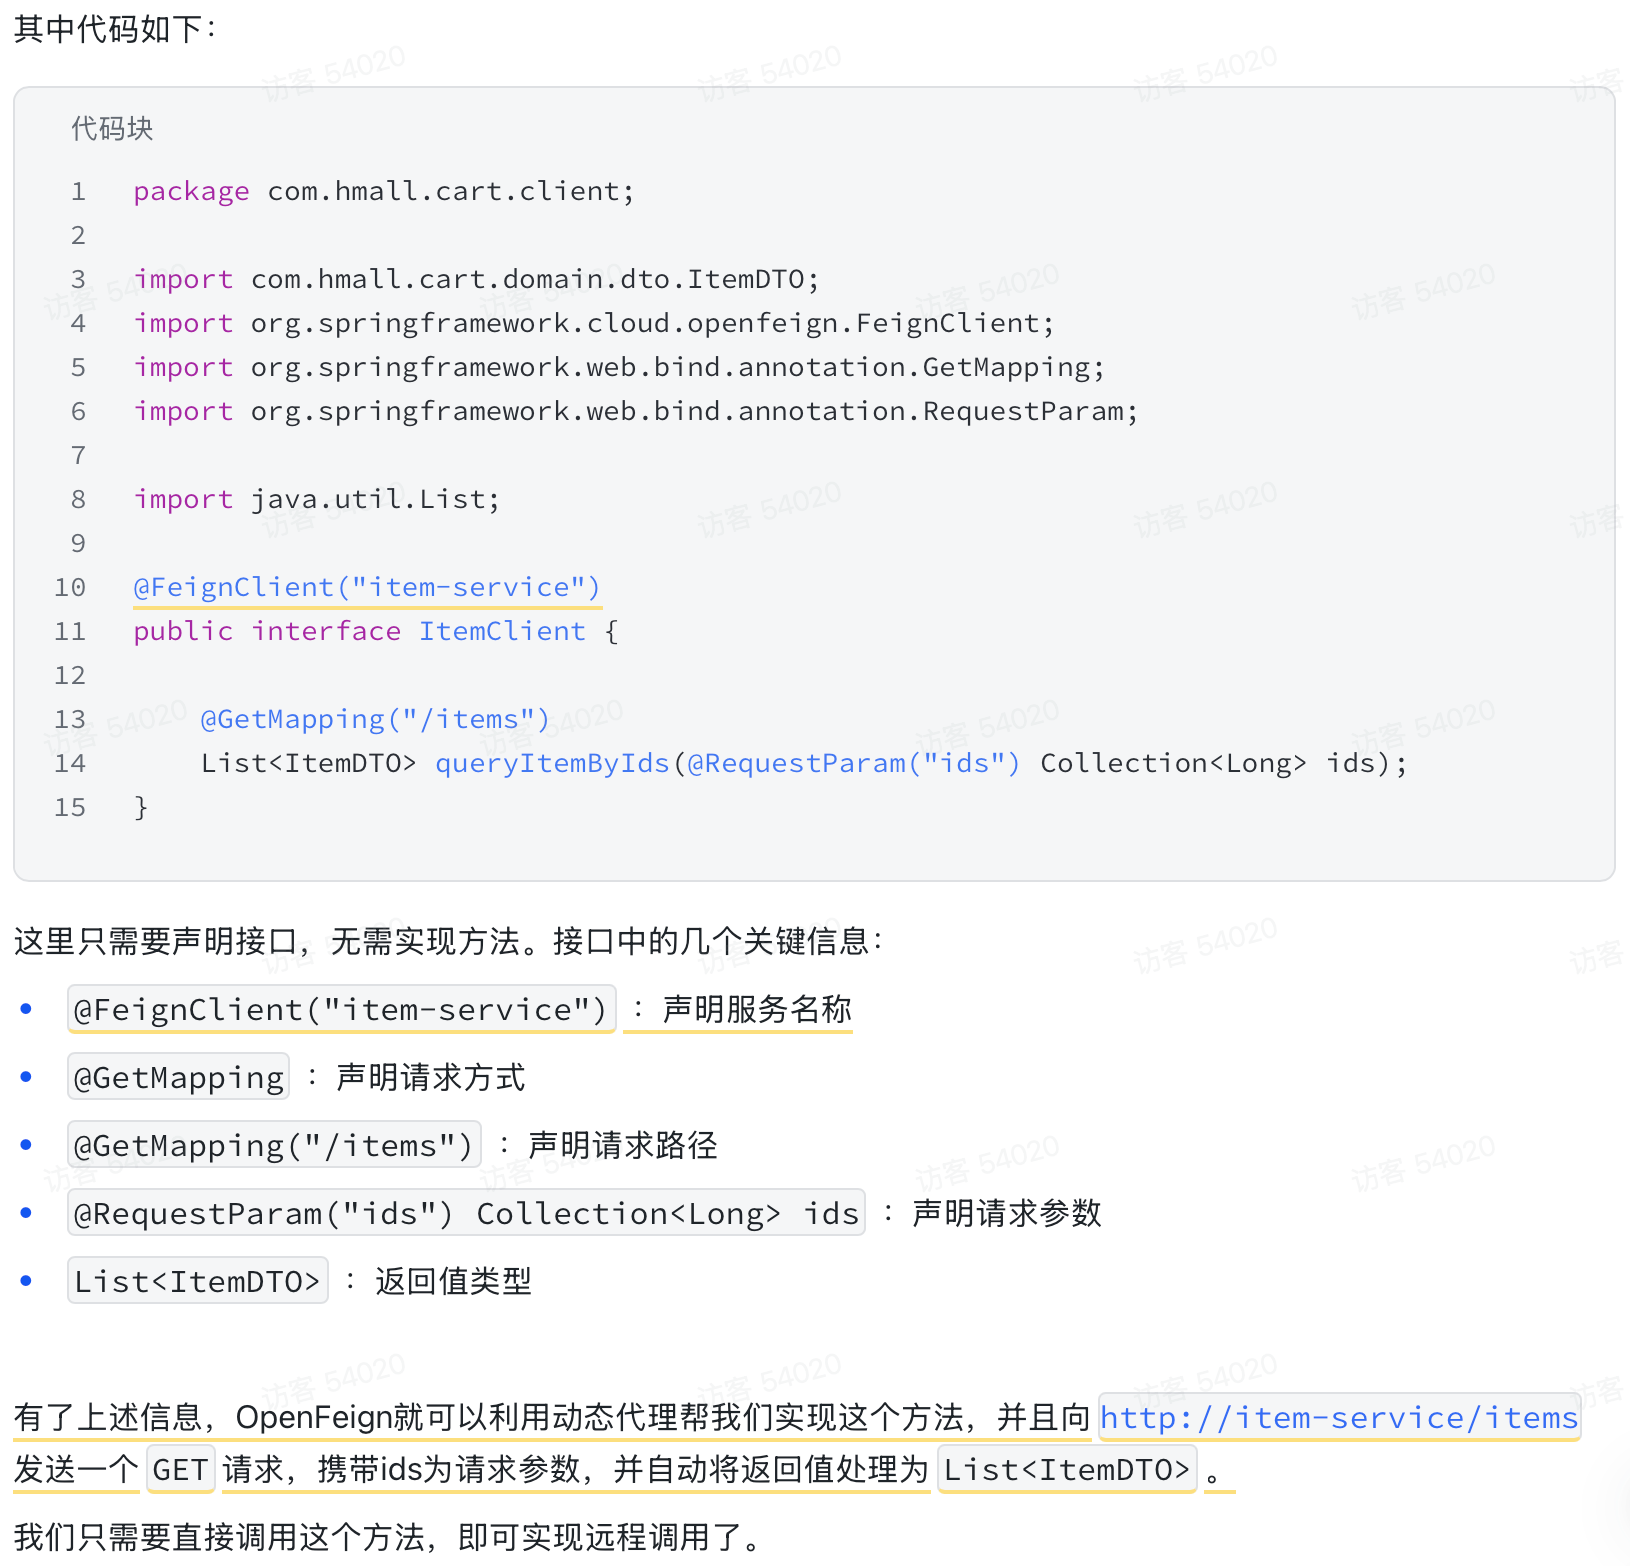
远程调用(openfeign)
使用步骤:
在服务消费者里引入 spring-cloud-starter-openfeign。
在启动类加 @EnableFeignClients。
定义一个接口,写上 @FeignClient(name = “服务名”),就能像本地方法一样调用远程服务。
负载均衡
DiscoveryClient,SpringCloud已经帮我们自动装配,我们可以直接注入使用
心跳机制
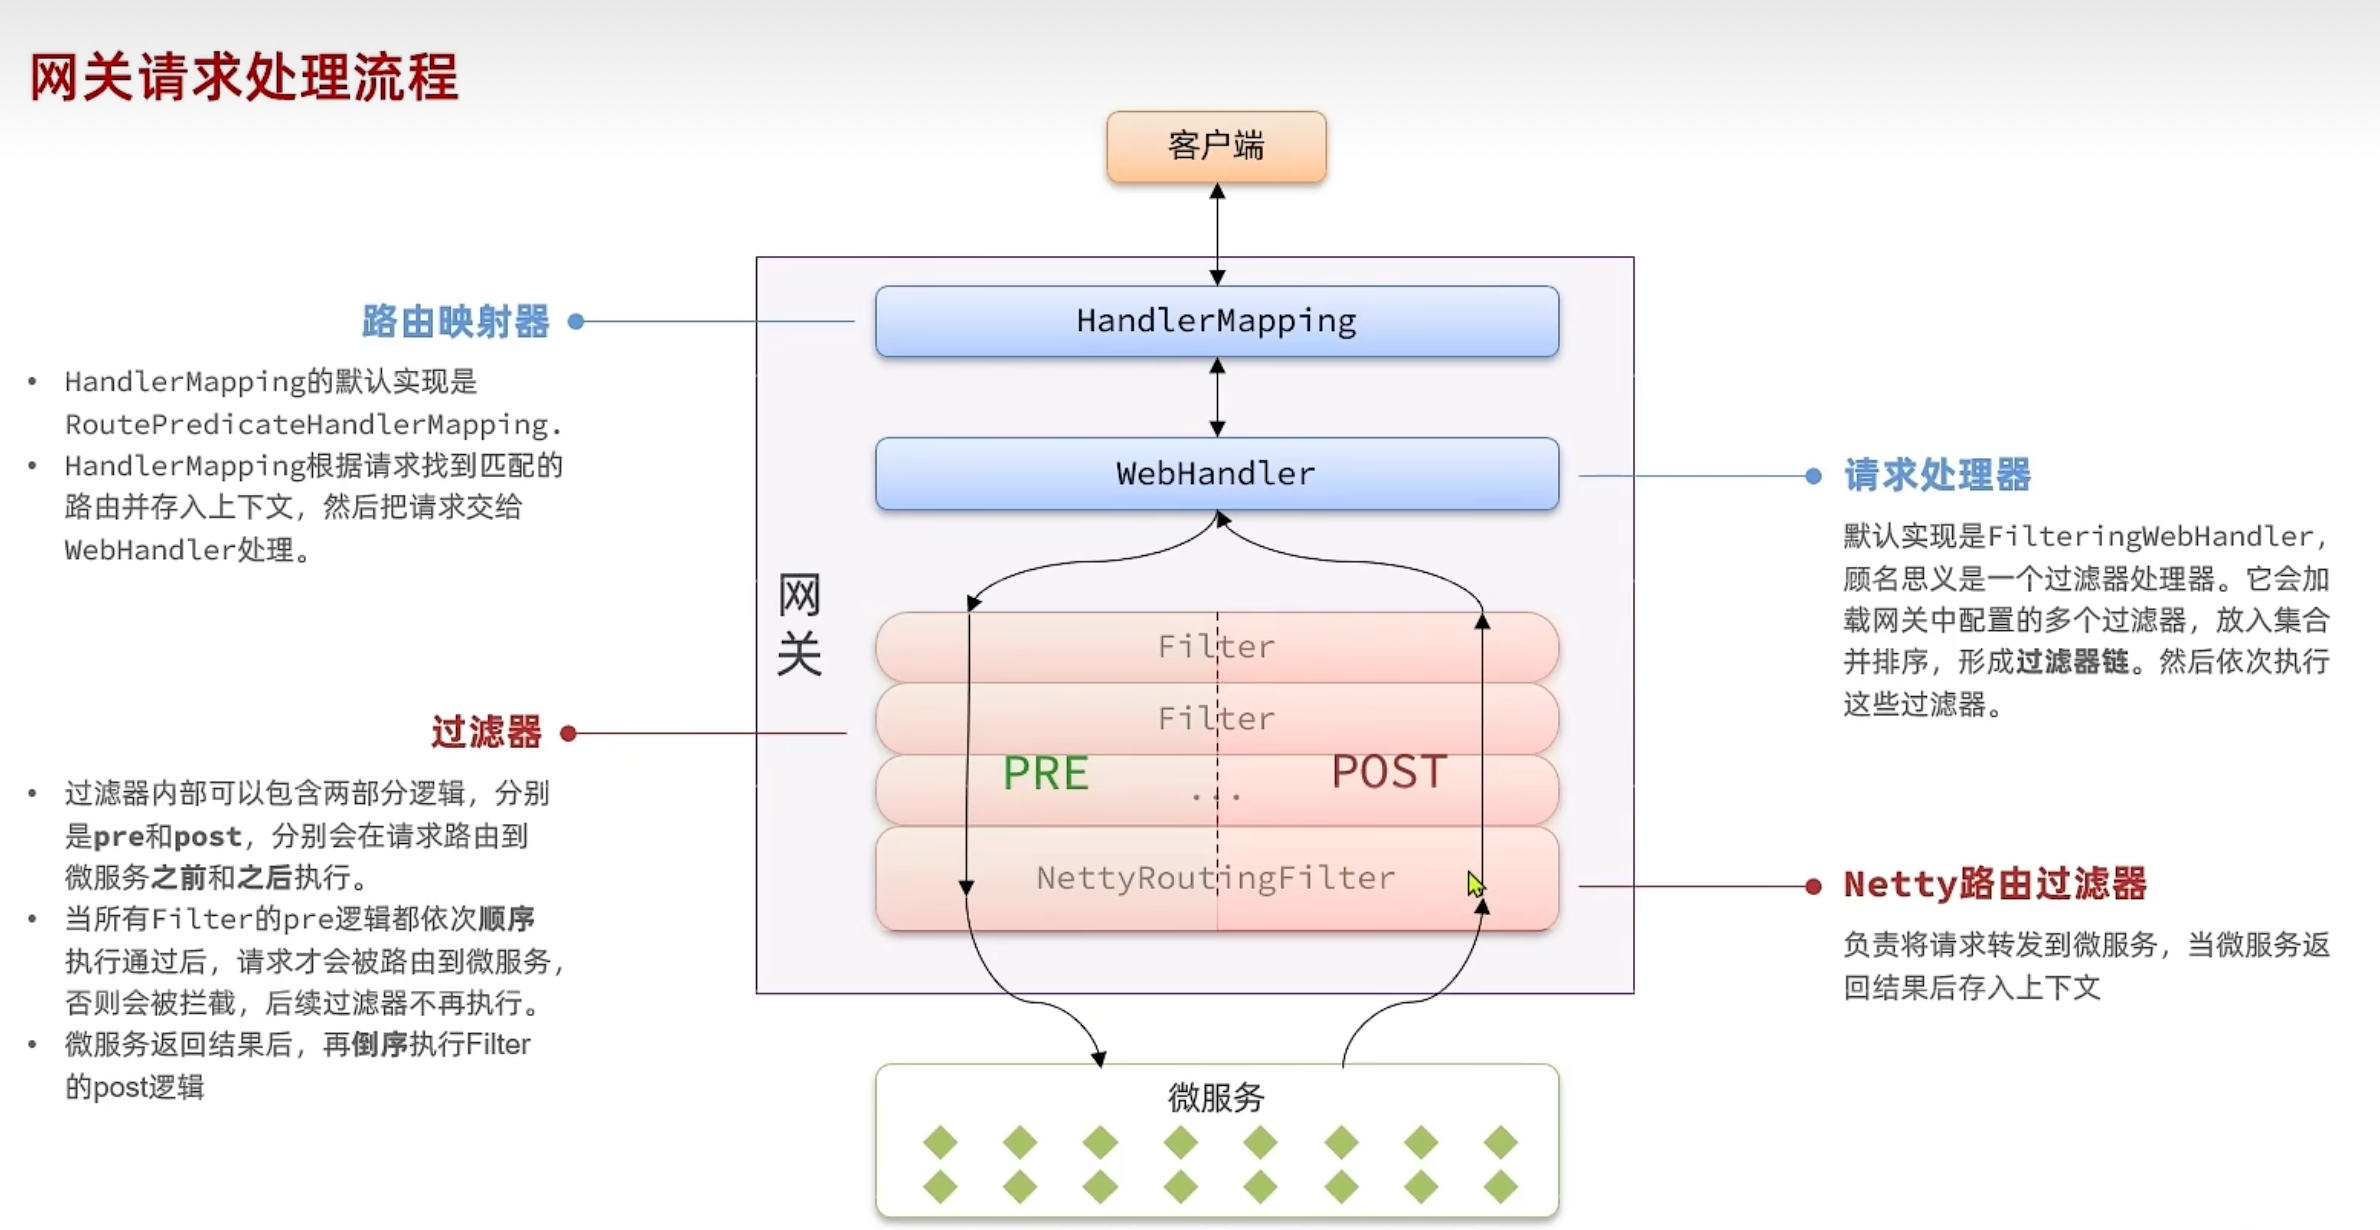
网关
路由、转发、身份验证
可以从注册中心拉取端口
前端->网关->注册中心->分布式后端
解决前端对微服务难以维护,有了网关,前端就可以像单体式架构一样直接调用网关了
但是!!后端开发仍然需要配置路由规则,让json找到需要的服务
路由
Gateway 收到请求
请求被包装成一个 ServerWebExchange 对象。
路由匹配阶段
Gateway 遍历所有 Route。
调用每个 Route 的 predicate。
这里的 Path=/api/user/** 断言返回 true → 匹配成功。
路由命中
- Gateway 确定目标 URI 为 lb://user-service。
- 创建过滤器链(包括全局和局部过滤器)。
执行前置过滤器(pre)
- StripPrefix=1 会将路径从 /api/user/list 变成 /user/list。
- 然后继续。
请求被转发
- Gateway 将请求交给负载均衡器(LoadBalancerClient)。
- 实际转发给一个实例,比如 http://192.168.0.5:8081/user/list。
微服务处理并返回响应
- user-service 返回 JSON 数据。
执行后置过滤器(post)
- 比如加响应头、记录日志等。
Gateway 将结果返回客户端
路由断言:规定请求是否命中某条路由
路由过滤器:请求转发前后对请求/响应做修改、增强或拦截
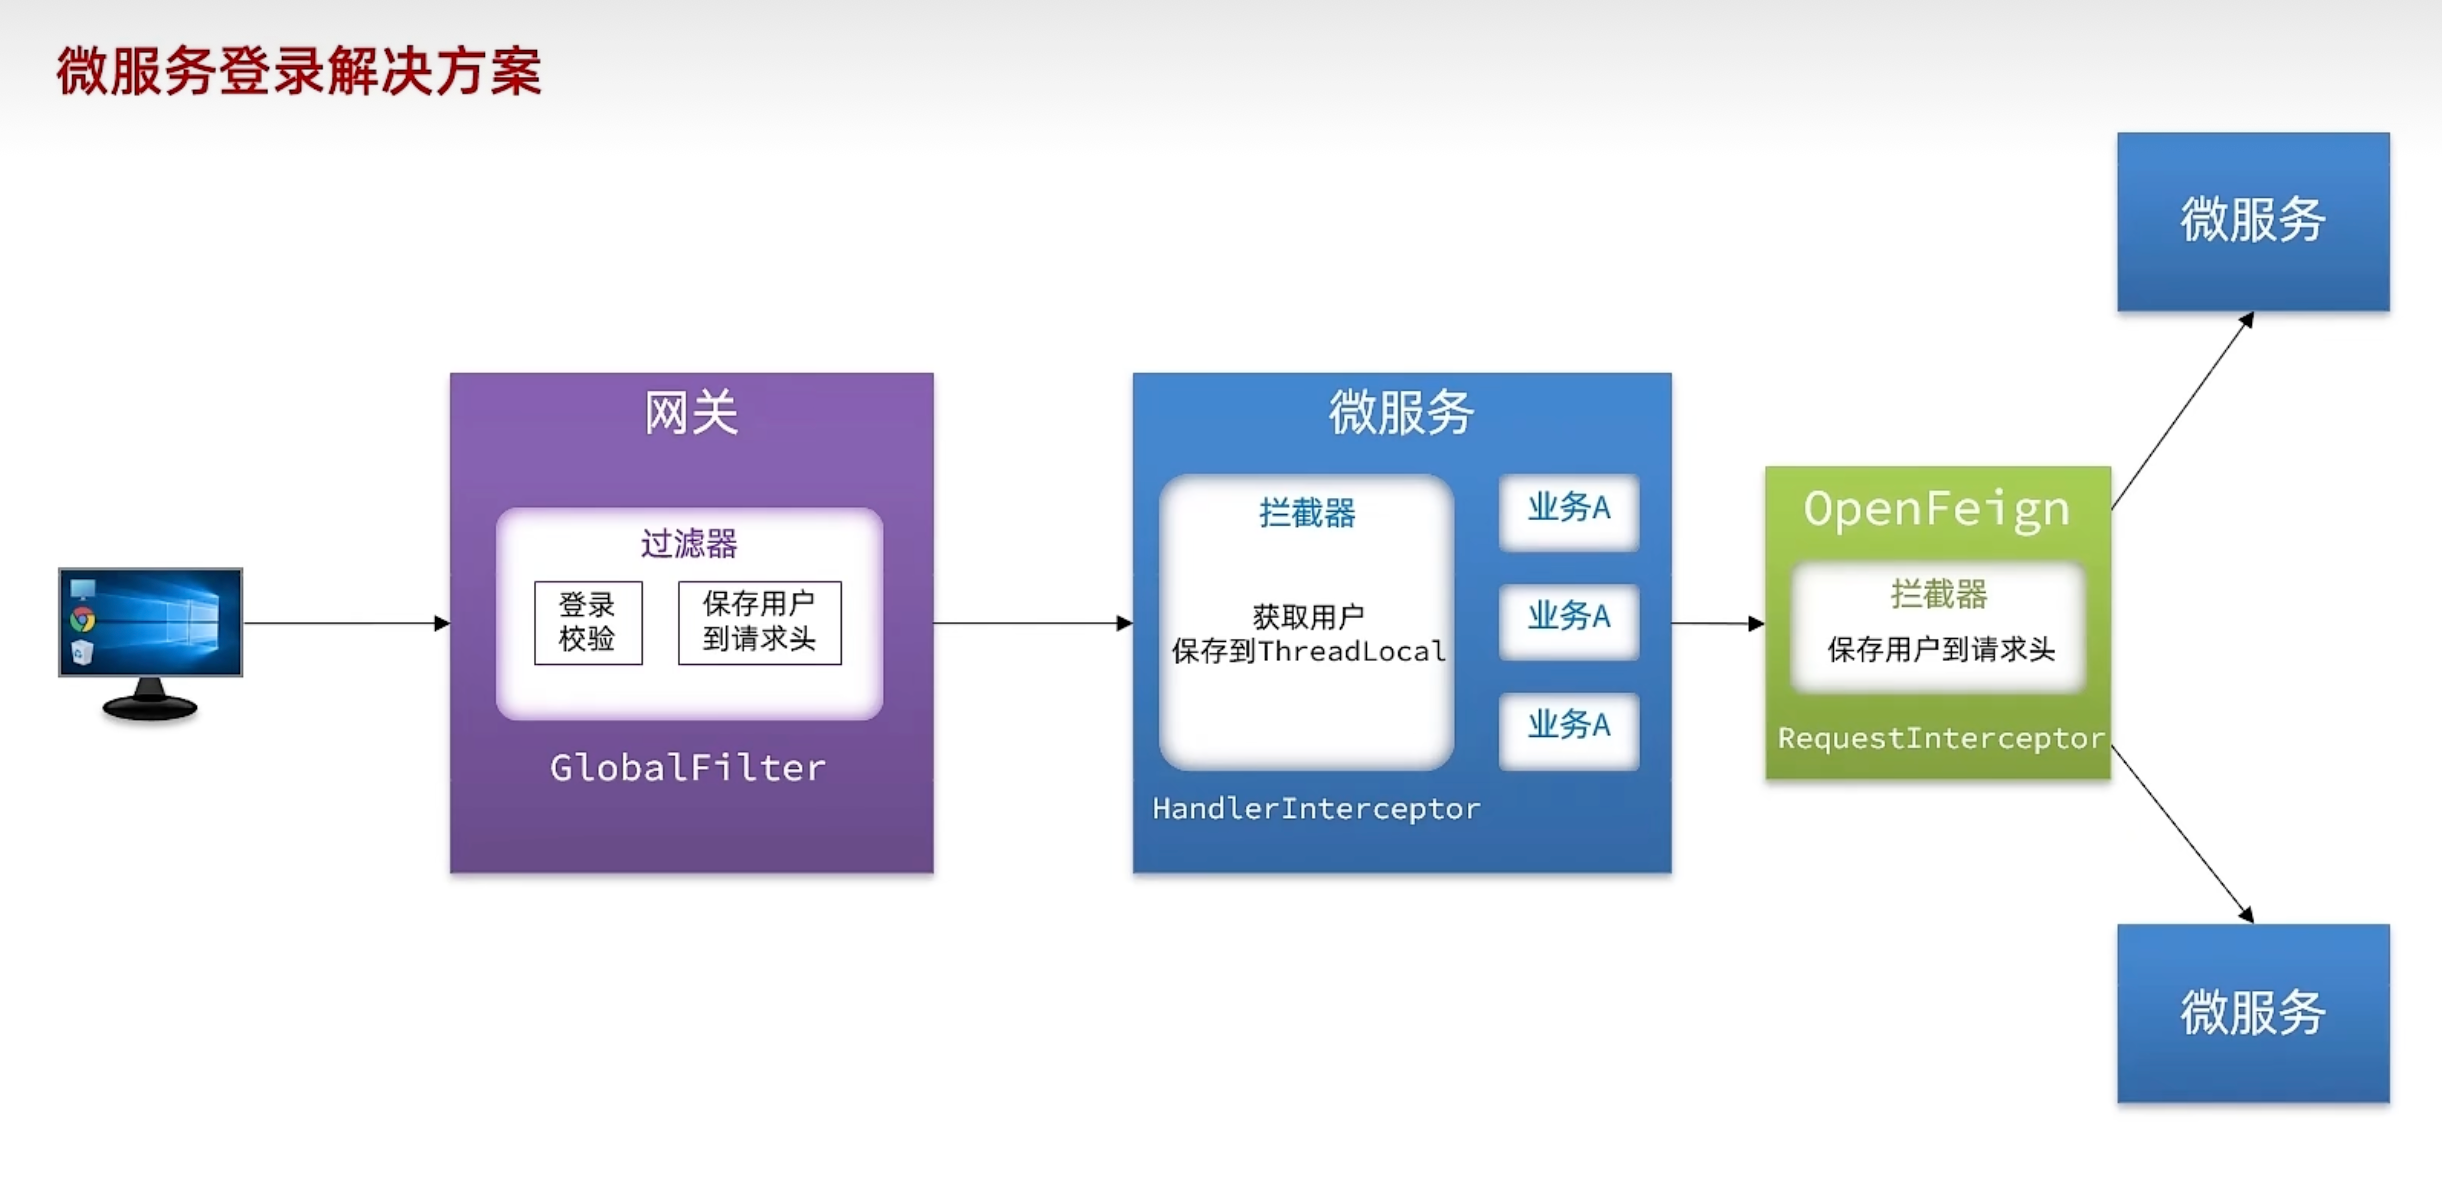
网关登陆校验的原理就是在pre设置一个过滤器,就可以在网关转发之前做校验
自定义过滤器
登录校验
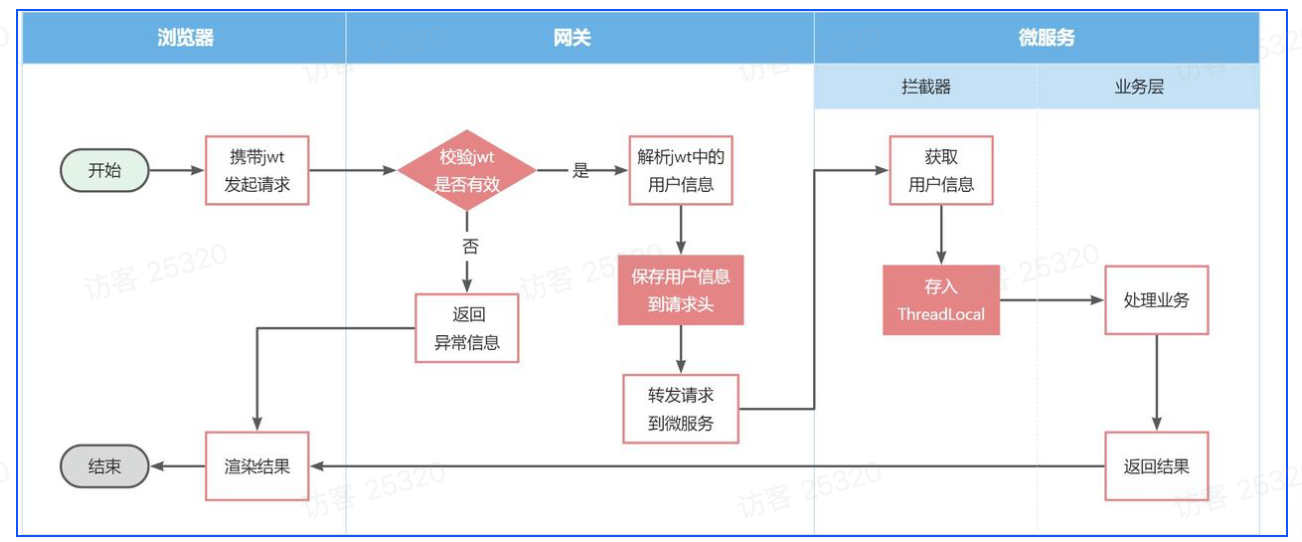
1.gateway -> 微服务:
修改登录校验拦截器的处理逻辑,保存用户到请求头
hm-common中拦截器保存登录用户,保存到ThreadLocal
拦截器应该只在微服务中,gateway可以用SpringMVC来排除
2.微服务 -> 微服务:
通过OpenFeign在hm-api的拦截器传递用户信息
配置管理(Nacos)
微服务重复配置过多,维护成本高
业务配置经常变动,每次修改都要重启
服务网关路由配置写死,如果变更要重启网关
配置共享
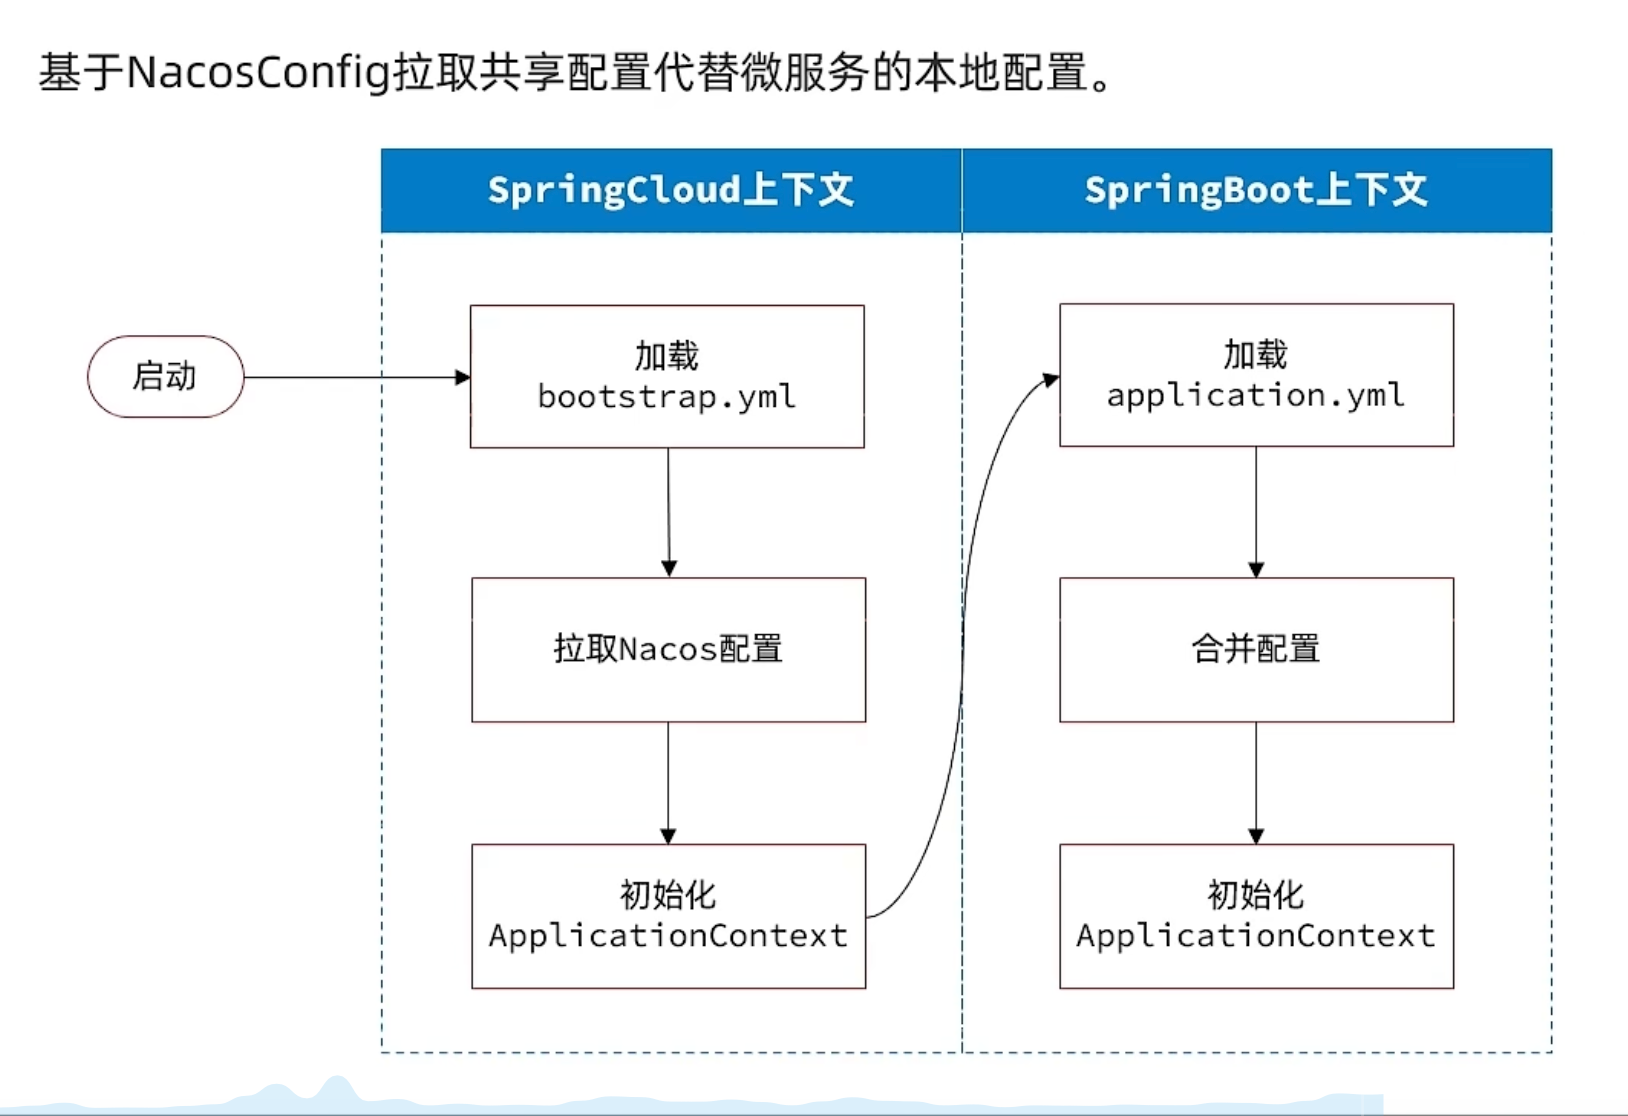
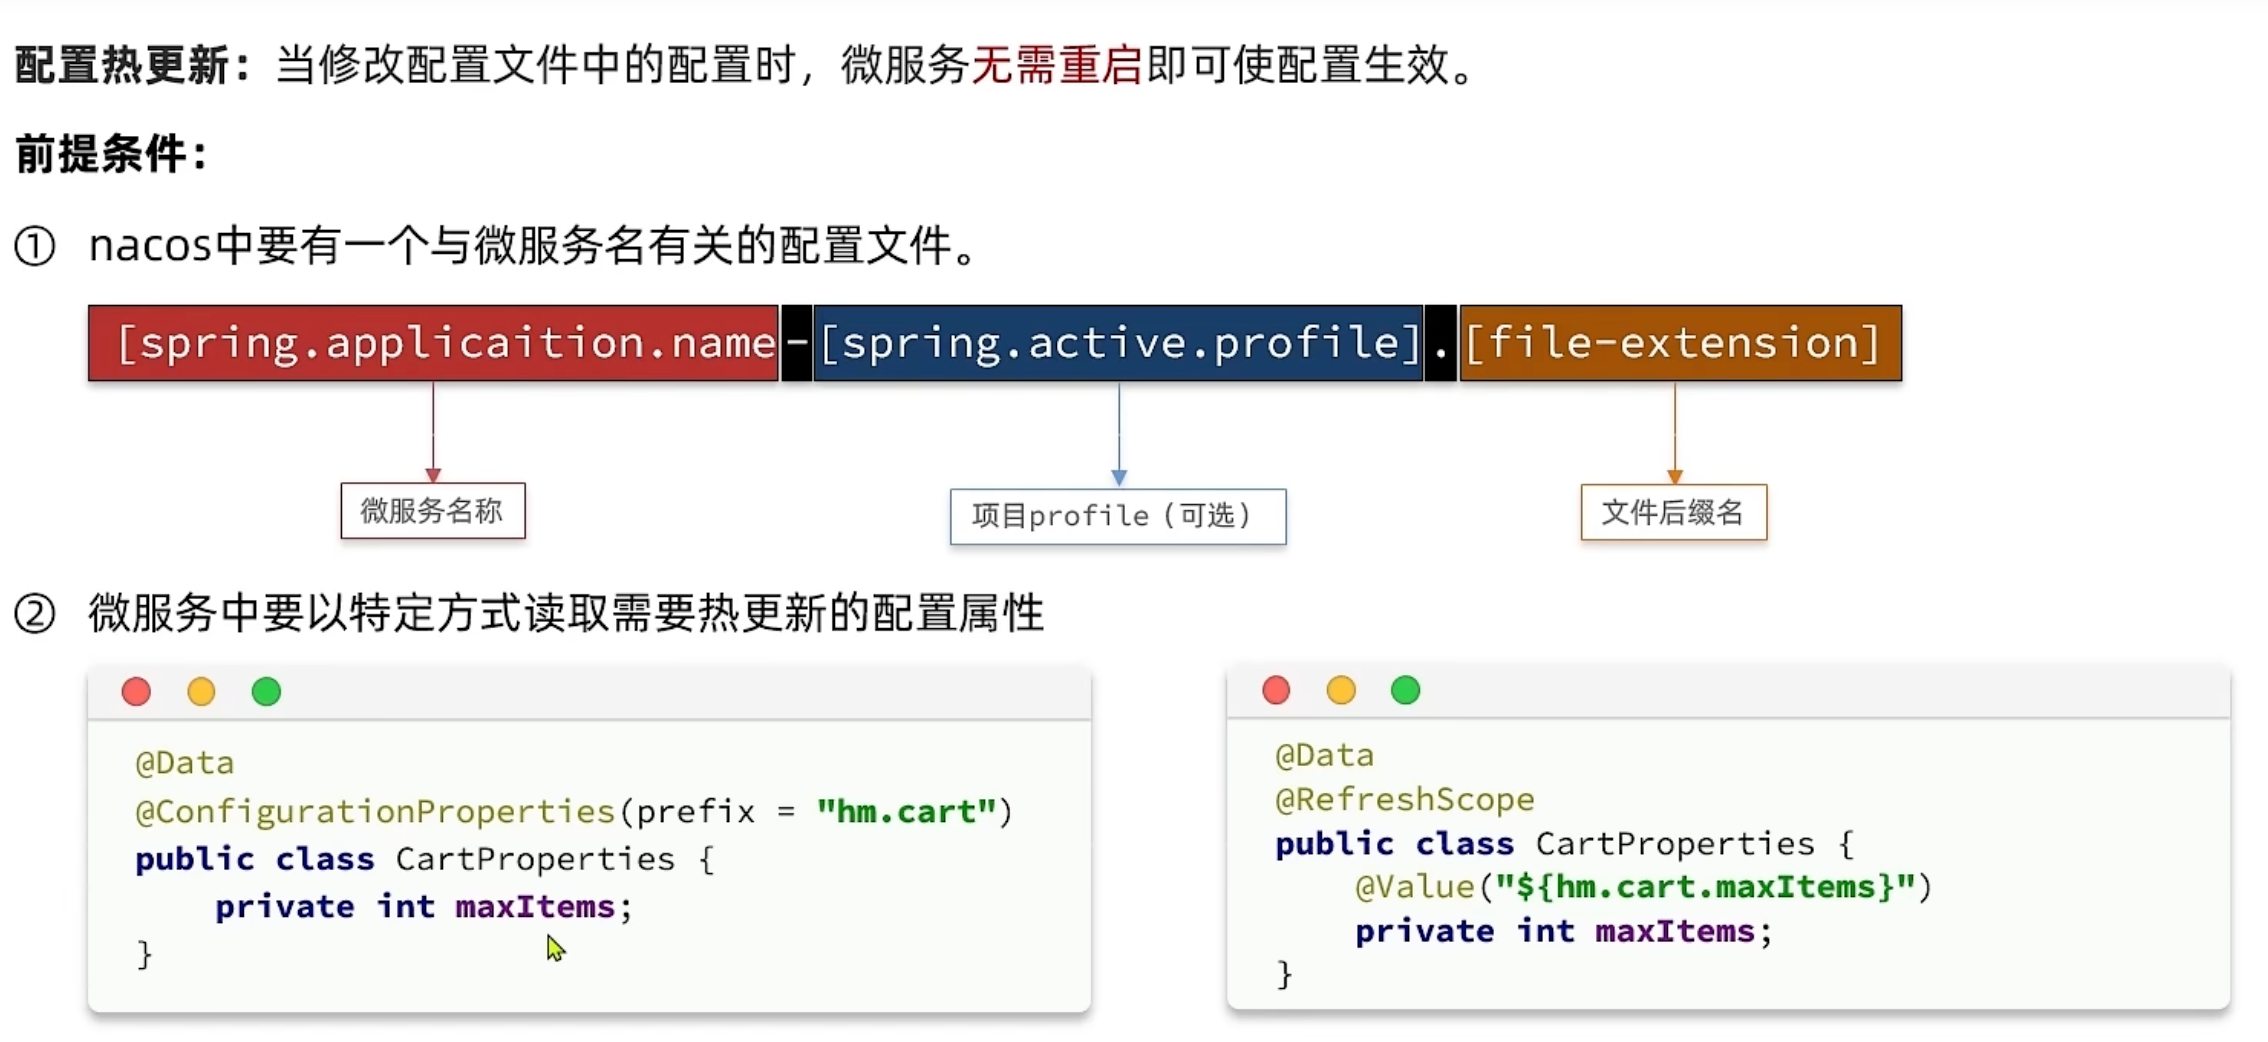
配置热更新
TODO 动态路由
微服务保护(雪崩)
1.请求限流
2.线程隔离
3.服务熔断
4.失败处理fallback
Sentinel
分布式事务
微服务下,事务回滚无法完成
seata
高并发的解决方法
XA 模式(数据库层两阶段)
事务锁,强一致性
AT 模式(Seata UndoLog)
TCC 模式(业务层补偿)
异步通讯
作用:
1.异步
2.解耦
RabbitMQ
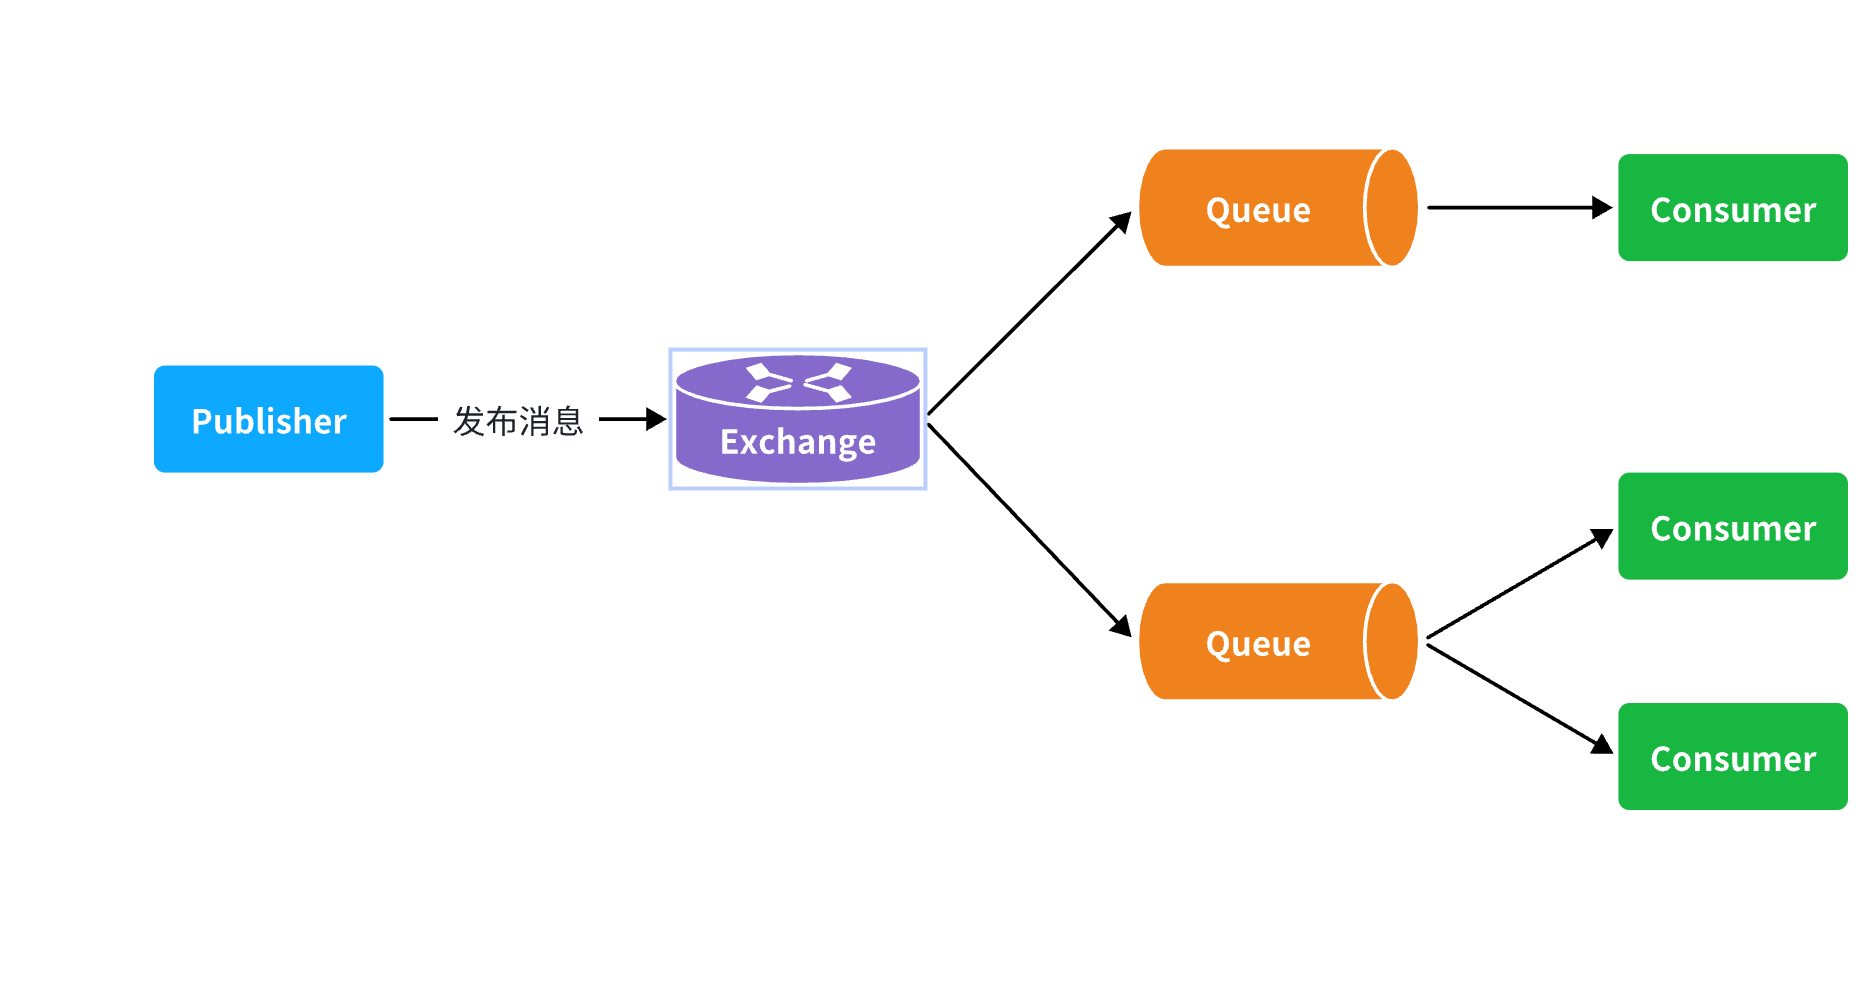
交换机(Exchange)
Fanout:广播,将消息交给所有绑定到交换机的队列。
Direct:订阅,基于RoutingKey(路由key)发送给订阅了消息的队列
Topic:通配符订阅,与Direct类似,只不过RoutingKey可以使用通配符
Headers:头匹配,基于MQ的消息头匹配,用的较少。
s-pay-mall业务流程
类的静态方法没法设置对象状态.可以用类生成对象,设置对象状态.这就是实例化.
每次都要实例化有 多层嵌套、销毁、多实例 的麻烦.所以IoC通过:
- 让类进入容器: 类加@Component,或者配置类加@Bean
- 给属性赋值: 基本类型和String 使用 @Value , 其他的 使用 @Autowired (注入方式多用构造函数)
- 调用动态方法
此外,IoC的优势有:
IOC 容器是 AOP 的基础.通过容器管理 Bean,可以在 Bean 方法执行前后加增强(事务、日志、权限校验).
如果对象不在容器里,就无法自动代理和增强
登录校验
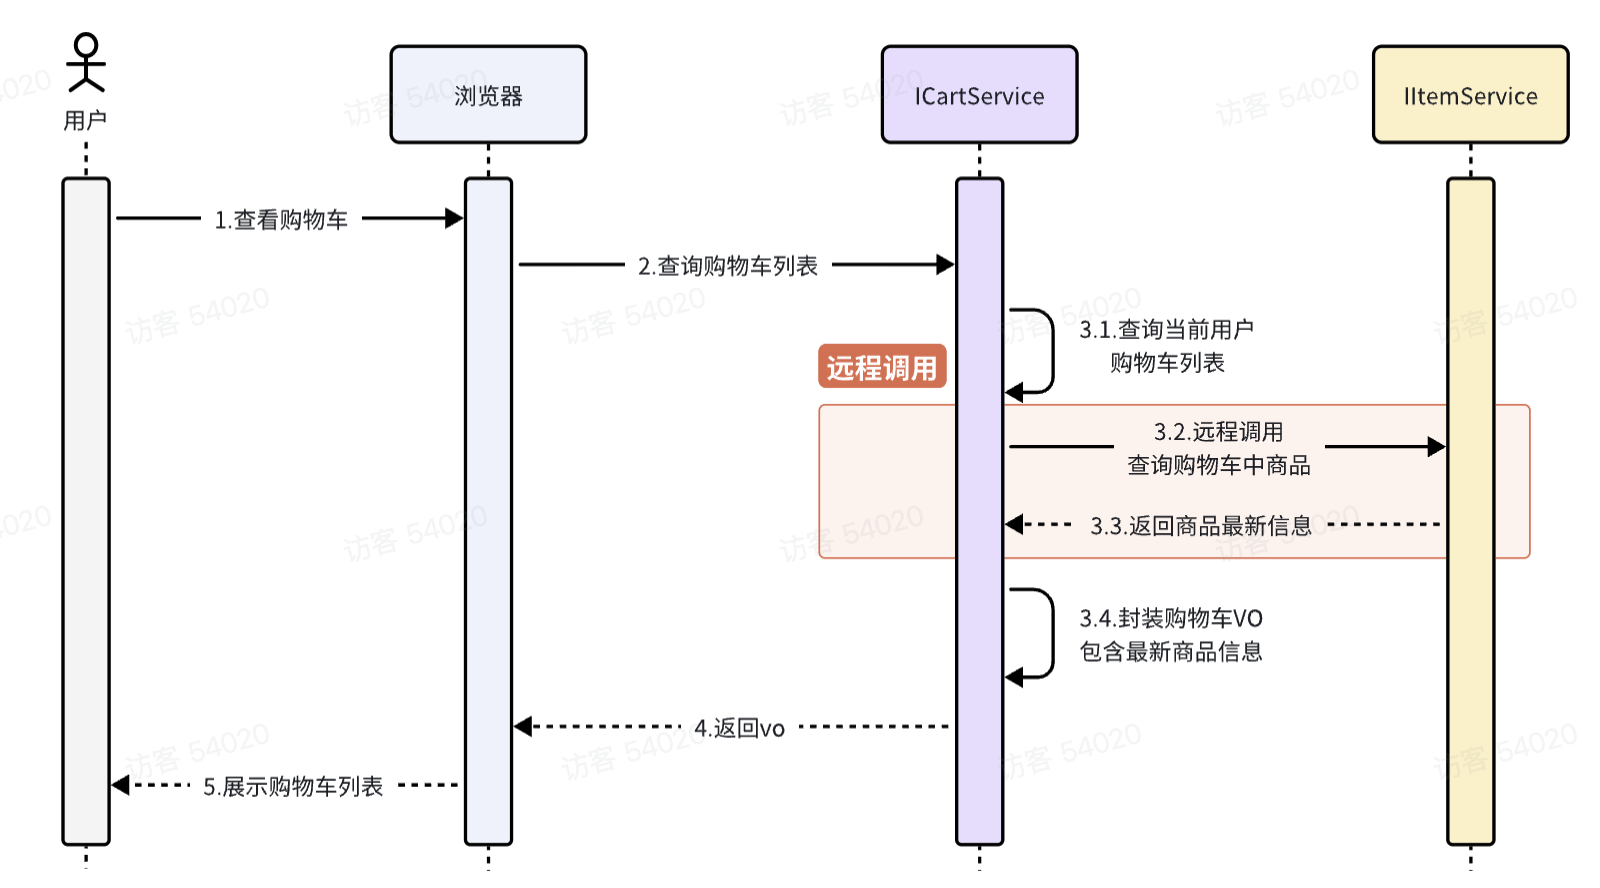
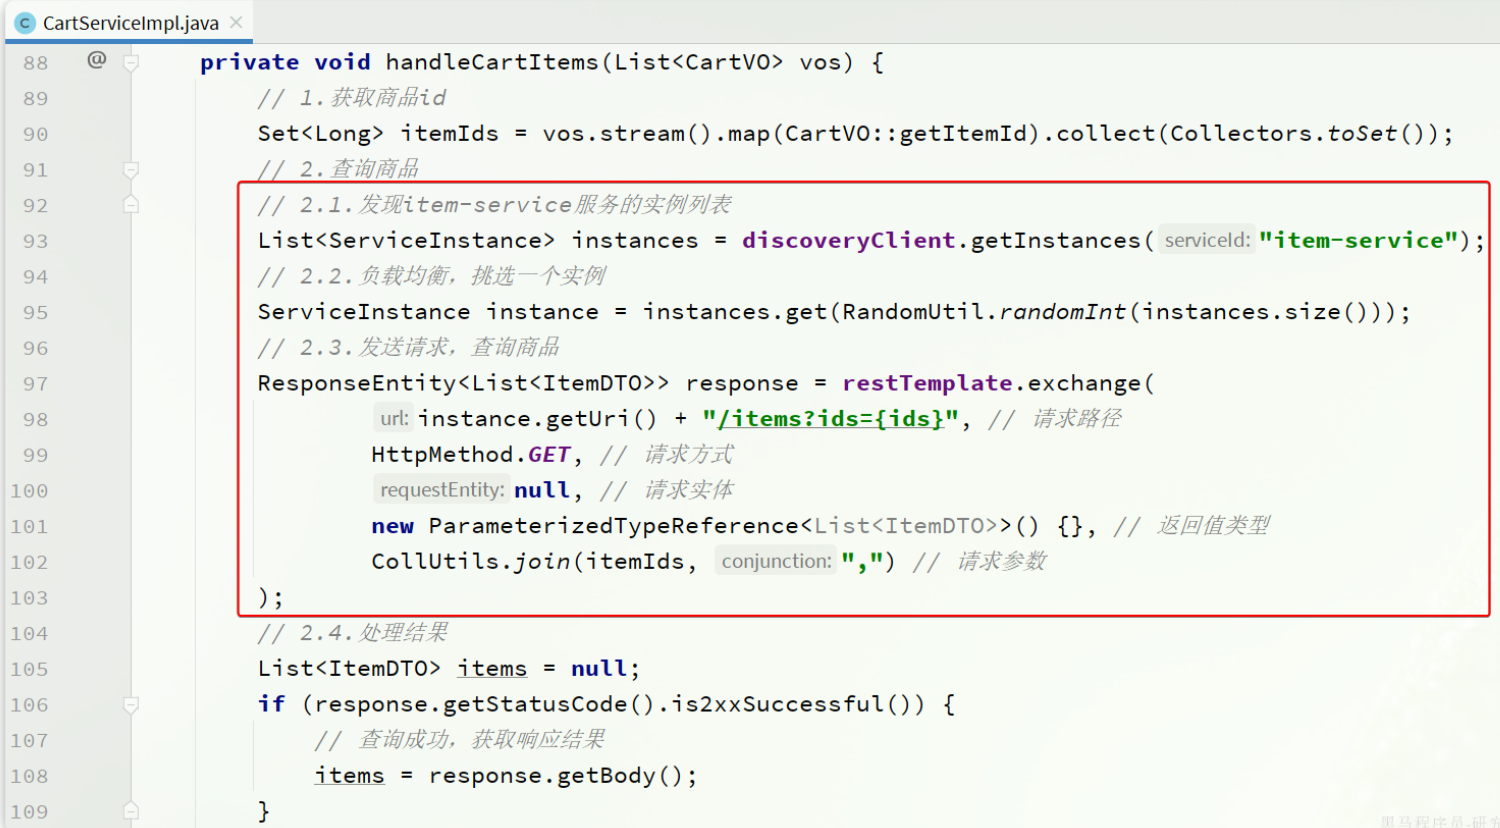
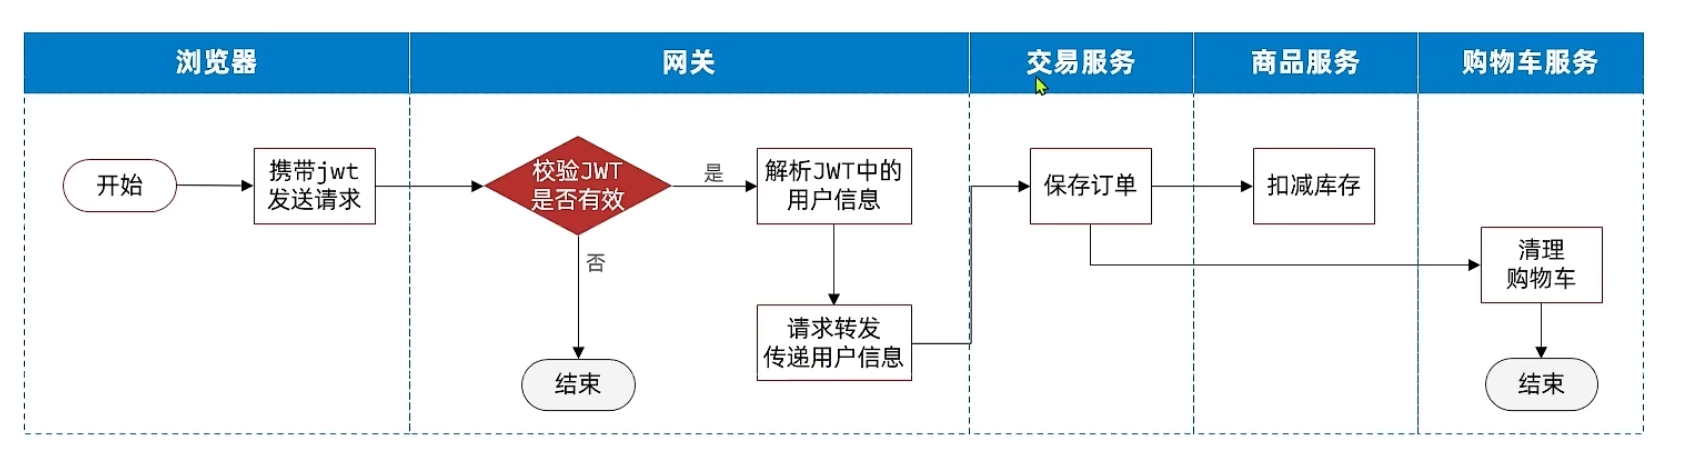
商品交易
1 | graph TD |
具体代码分析
鉴权
请求示例:
1 | timestamp = 1000000 |
解码 token在网站设置
1 | SignatureUtil.check(token, signature, timestamp, nonce) |
为什么需要同时使用 timestamp 与 nonce?
随机数 nonce :保证请求在并发场景下唯一
nonce 的意义在于避免签名冲突。
在实际系统中,同一秒内可能出现大量并发请求。
如果没有 nonce,所有同一秒内的请求会共享相同的 timestamp,导致 signature 可能重复。
因此 nonce 用于确保:
- 同一秒内的请求也具有不同签名;
- 内容相同的多个请求仍能被区分。
需要注意的是:
nonce 本身不包含时效性。攻击者可以截获一次合法请求(含 nonce),在之后任意时间重新发送。如果服务器不记录 nonce,将无法分辨这是旧请求。
时间戳 timestamp :判断请求是否在有效期内
即便 nonce 很随机,但无法判断该请求是“刚刚发送的”还是“很久以前的”。
timestamp 则解决了这一问题。
服务器常见的做法是:
- 若 timestamp 与当前时间差距过大(例如超过五分钟),则认为该请求为过期请求并拒绝处理。
因此 timestamp 的核心作用是防止重放攻击,即阻止攻击者对旧请求进行重复发送。
为什么不能只使用 timestamp
timestamp 精度通常为“秒”。
在实际业务中,同一秒可能出现多条请求。
若只依赖 timestamp,将无法区分同一秒内的多条合法请求,从而可能导致签名冲突。
nonce 的存在就是为了解决这一问题。
- 公众号的事件推送常出现并发;
- 同一秒内可能由多名用户触发多条消息;
- 官方服务器可能批量推送多条记录。
因此,真实环境中无法依赖 timestamp 单独提供区分能力,所以 nonce 必须保留。
登陆
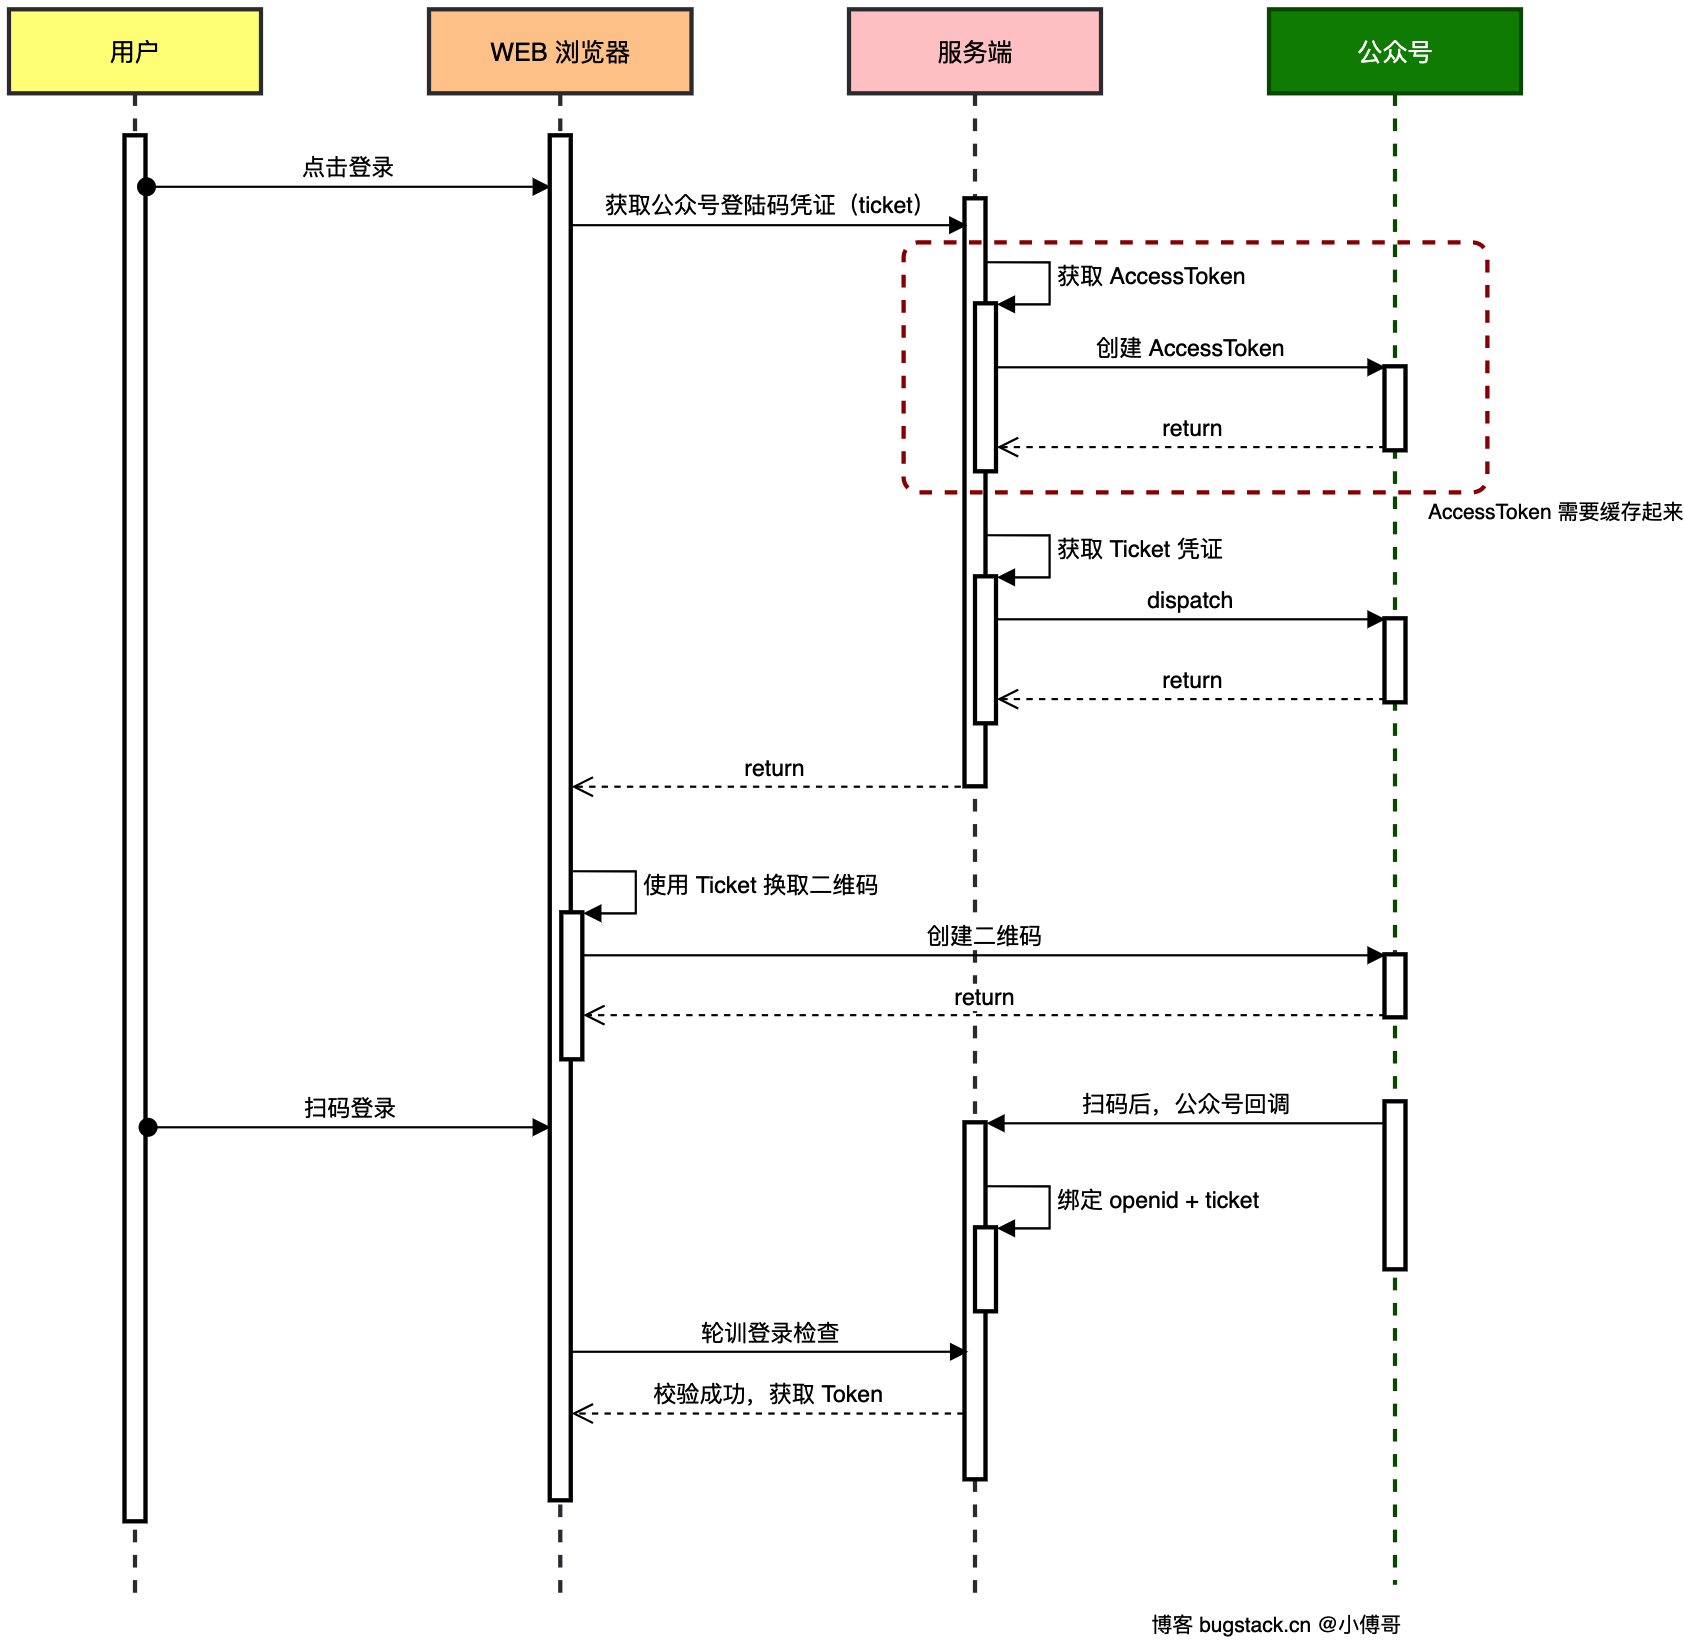
开发者设置 Token 固定 验证微信服务器调用你接口的合法性 永久
access_token 会变 调用微信 API(发消息、生成二维码等) 2 小时
1 | private static final String BASE_URL = "https://api.weixin.qq.com/"; |
这个@Bean的作用是:
把一个配置好的 Retrofit 客户端交给 Spring 容器管理,然后可以在项目中通过依赖注入直接使用。
1 | @Autowired |
实例化:
- 依赖对象状态(比如 base URL、converter、token 等)。
- 需要先生成实例,才能调用方法。
- 调用实例方法时,Retrofit 内部会生成 HTTP 请求并发出去。
问题1:
根据你之前提供的环境:
- IDEA 2025.1
- JDK 1.8
- Maven 3.8.x
- Lombok 1.18.30
这种组合在某些 JDK 1.8 上仍会触发 TypeTag :: UNKNOWN。原因主要是 Javac 内部版本过旧,无法正确解析枚举/Builder。
py爬虫_c语言考试网站
观察网站
查看源代码只有网站外观设计后,发现F12抓包后名为[practice]的文件内有“label”和”questionBh”两个题目号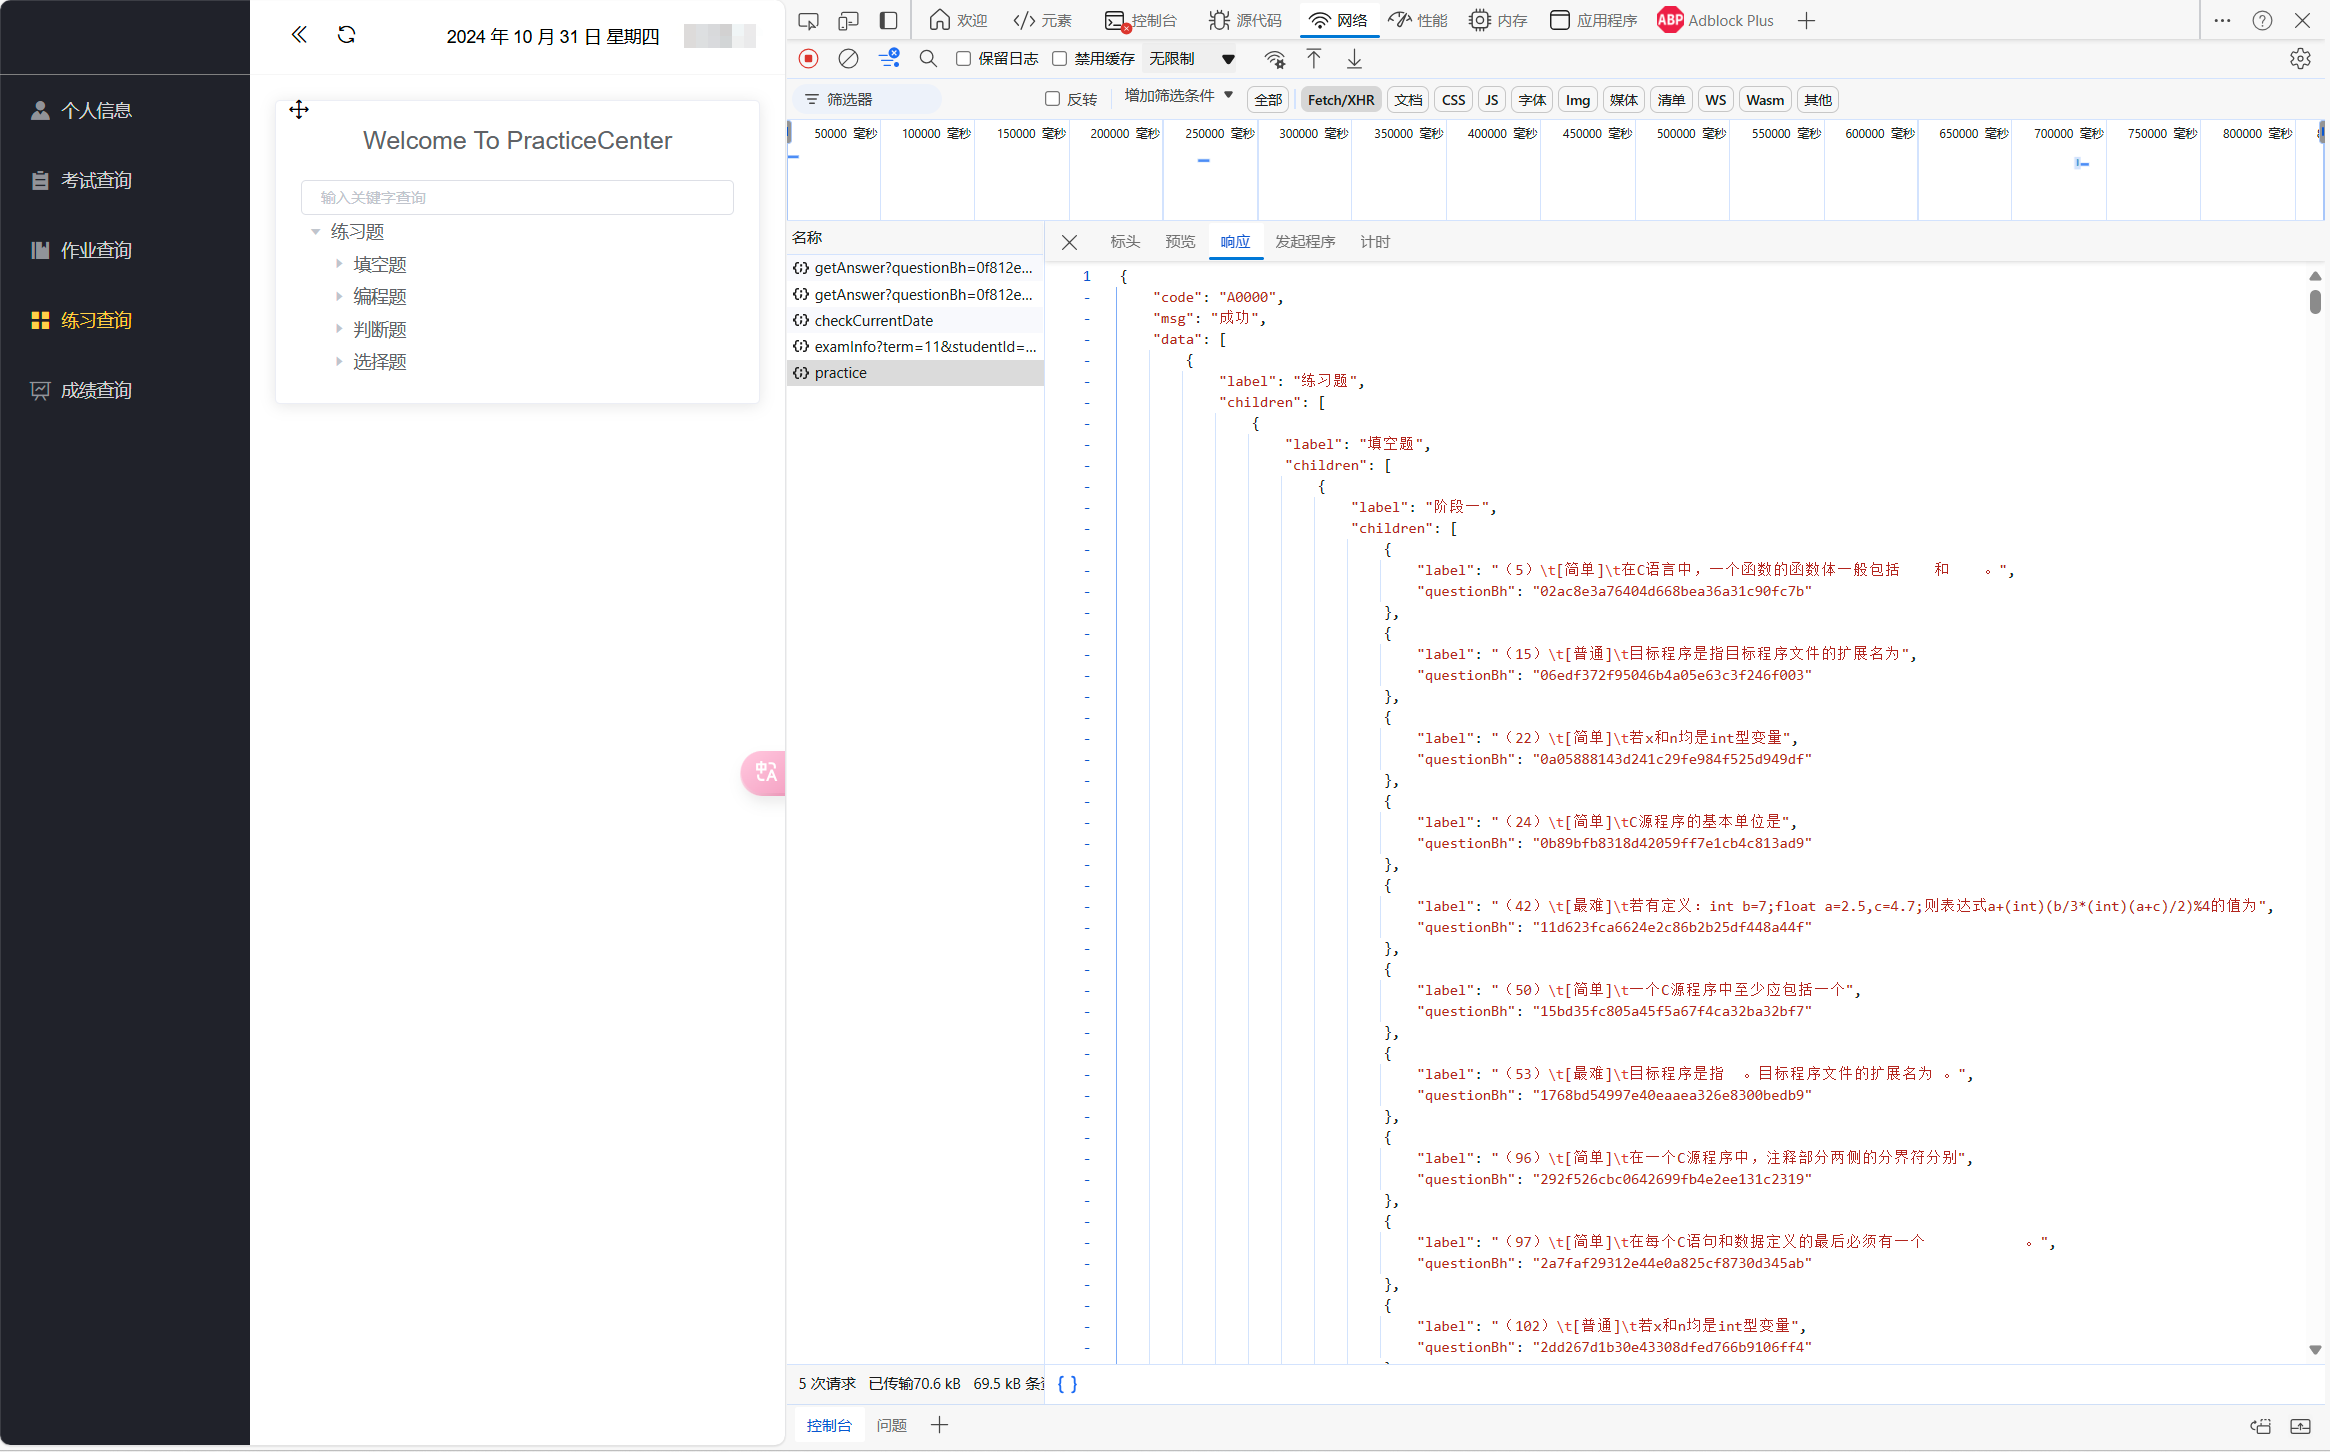
点进题目后再点击查看答案,抓包的文件”data”中就有完整的答案
点开第二次抓包的标头,发现url是http://[一些域名]={questionBh}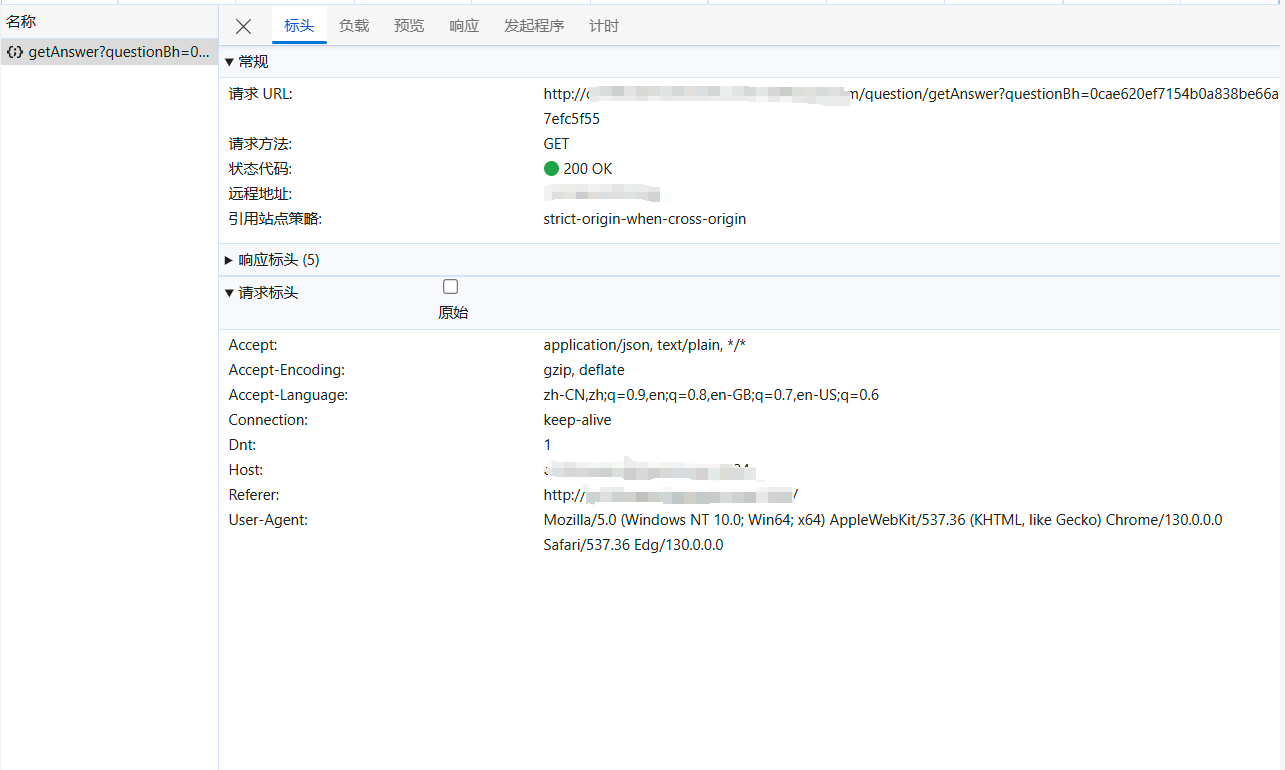
我们可以通过 label -> questionBh -> answer
写代码
先进行 label -> questionBh 的步骤
1 | import requests |
再对得到的格式进行一些调整,并变成csv格式,示例如下
1 | num,questionBh |
再进行 questionBh -> answer 的步骤
1 | import requests |
整合代码,通过csv文件串联起来
1 | import csv |
使用 ast 解析转义字符
笔者在学习中发现,使用 ast.literal_eval() 解析转义字符可以消除多余字符的影响,省去了复制到ai转换的麻烦
1 | ans_list = [i.group("ans") for i in result] |
完整代码
1 | import csv |
结果
生成结果如下图,经过修改后可以直接复制到提交窗口使用啦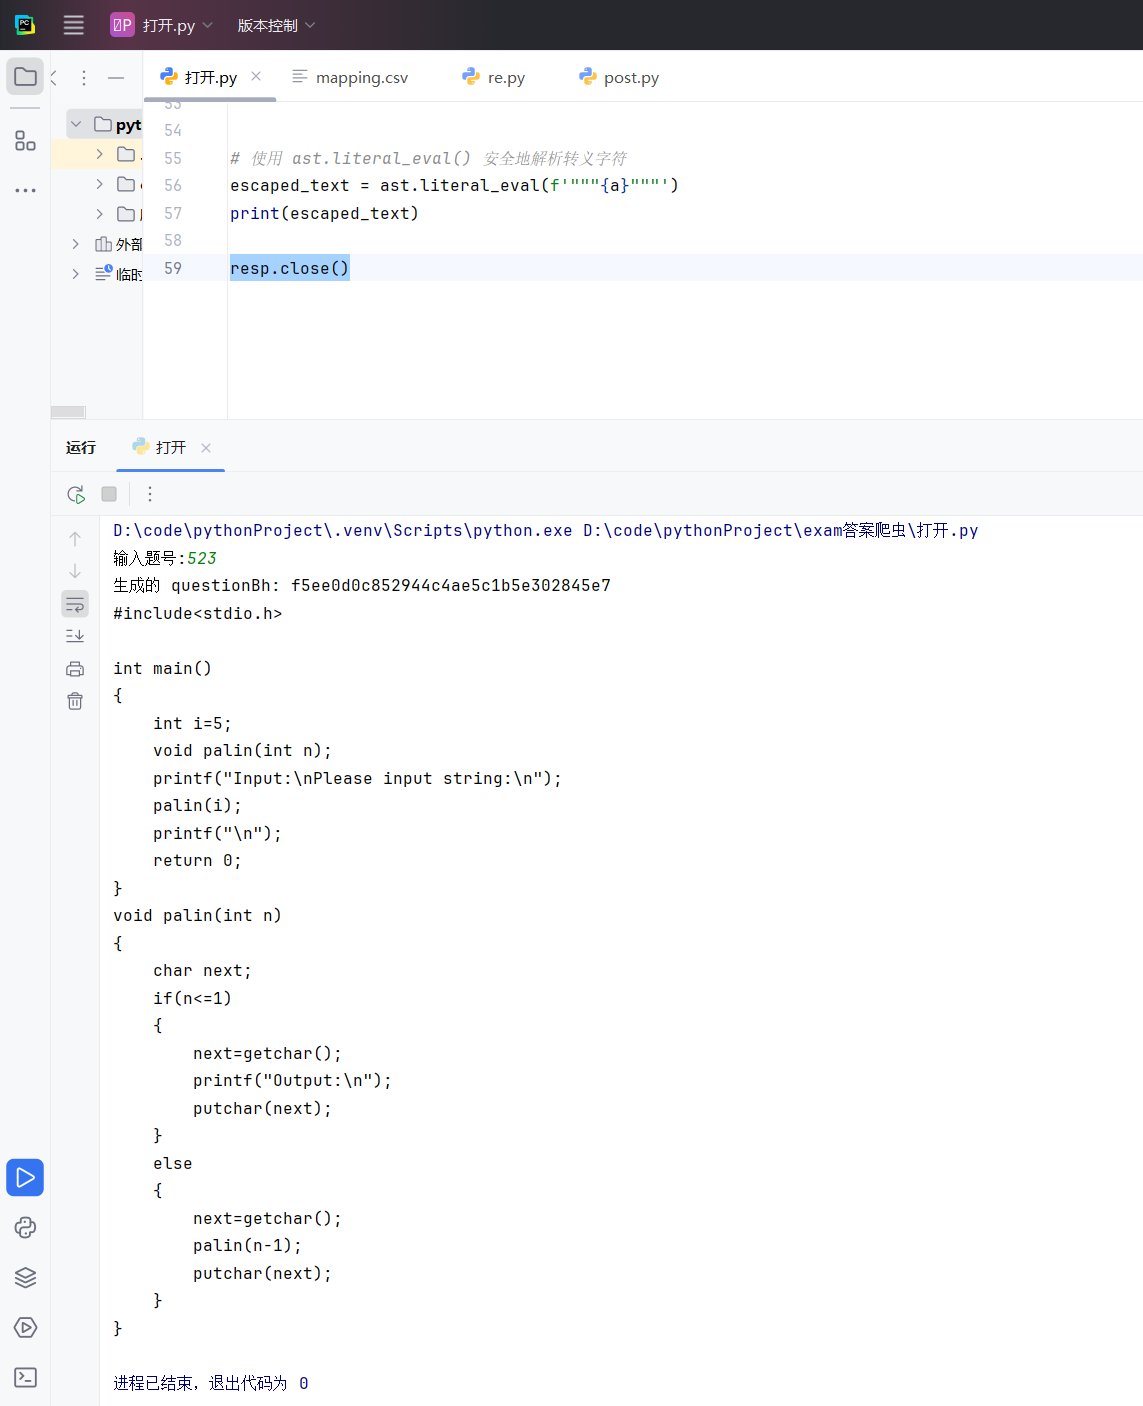
参考
[bilibili]Python爬虫教程 通过视频,我学习了抓包方法,re,正则表达式,最简单的通信原理
在线正则表达式测试
py爬虫_python考试网站
基于 requests 的 HTTP 协议逆向方案,直接调用后台接口。
1. 数据加载模块 (data_loader.py)
1 | import json |
2. 业务逻辑模块 (question_service.py)
1 | from typing import List, Dict, Any |
3. 主程序入口 (main.py)
1 | from data_loader import DataLoader |
py爬虫格式
get
import requests
query= input(“输入你想搜索的东西\n”)
url = f’https://www.sogou.com/web?query={query}‘
headers = {
“user-agent”:”Mozilla/5.0 (Windows NT 10.0; Win64; x64) AppleWebKit/537.36 (KHTML, like Gecko) Chrome/130.0.0.0 Safari/537.36 Edg/130.0.0.0”
}
resp = requests.get(url,headers=headers)
print(resp)
print(resp.text)
resp.close()
post
import requests
url = “https://fanyi.baidu.com/sug“
word=input(“输入想翻译的单词”)
dat={
“kw”:word
}
resp = requests.post(url,data=dat)
print(resp.json())
resp.close()
re
import re
import csv
findall 很小的文件可以用
lst=re.findall(r”\d+”,”my10086”)
print(lst)
finditer 迭代器?最常用
it=re.finditer(r”\d+”,”my10086”)
for i in it:
print(i.group())
search只找到一个结果就返回
#search返回是match对象,拿数据要.group()
lst=re.search(r”\d+”,”my10086”)
print(lst.group())
match必须从头匹配
s = re.match(r”\d+”,”my10086”)
print(s.group())
预加载正则表达式
obj = re.compile(r”\d+”)
it = obj.finditer(“1234”)
for i in it:
print(i.group())
it = obj.finditer(“5678”)
for i in it:
print(i.group())
查找限定组
obj = re.compile(“xxx.?xxx(?P
result = obj.finditer(s)
#取所有组
for i in result:
print(i.group())
#取某个组 #(?P
for i in result:
print(i.group(“name”))
blog维护和美化
感谢在搭建blog时参考的文章
(zhihu)Hexo+Next主题搭建个人博客+优化全过程
(个人)hexo 博客安装教程 胎教级
(github)live2d models
(个人)Hexo NexT 魔改系列之二 ── 搜索篇
(个人)一次完整的Hexo写作流程
(贴吧)本地访问正常但部署到GitHub上访问就出问题
(cnds)Hexo 搭建个人博客(八)NexT 侧边栏配置
(cnds)Hexo-Next 主题博客个性化配置超详细,超全面(两万字)
(个人)一次完整的Hexo写作流程
(个人)Hexo NexT 魔改系列之二 ── 搜索篇
(个人)Hexo+Next 搭建个人博客 (添加网页音乐播放器)
今后的想完成的美化
暂无
Hello World
Welcome to Hexo! This is your very first post. Check documentation for more info. If you get any problems when using Hexo, you can find the answer in troubleshooting or you can ask me on GitHub.